Hello,
Firstly I would just like to say thank you to everyone who took the time to read and look at my new blog. I am so grateful and if this is your first time looking at my blog then, hello and thank you so much for reading. I'd also just like to apologize for the fuzzy pictures on the home page, I'm not sure why it does that or how to change it, sorry.
For this weeks blog post I am going to be continuing on telling you about my textiles journey, which leads me to my GCSE project (approximately 15/16 years old). Our brief was to design and create a garment (my first ever one) that was inspired by either the culture of Africa, Brazil, China or India. (I would just like to say that this project was intended to explore and celebrate different cultures, so my intention was to not offend anyone and I am extremely sorry if anything that I did back then offended you.) I chose to look at the Chinese culture as it is a place that I don't really know much about and after a little bit of research I was straight away inspired by the bright and vibrant colours used to celebrate their new year.
After much exploration which can be found in the images below, I finally came up with the idea of making a bright orange bat-winged style dress which was decorated with a gold texi-foil dragon on the sleeves. I chose orange as it is a colour I saw a lot of in many Chinese new year pictures. I also chose the batwing style sleeves as it was a popular shape at the time and it also portrays many similarities to the famous Chinese kimono sleeve. I loved the idea of having sleeves that were free to move on their own, creating an illusion that the dragon was dancing, just like I had witnessed in many Chinese celebration and parade videos. As the project brief was to be inspired by the Chinese culture, I chose to only have the dragon on the sleeves. So that when the arms are down it looks like a normal dress but when the arms are raised it reveals the hidden surprise.
This is one of my favorite pieces of work, it was the first thing that I had created that I could actually wear and I was so proud, as this was where I was allowed to truly design and make a garment all by my self. I didn't have to follow strict pattern rules, where we all had to make the same. I was able to go off and to an extent make what ever I wanted, especially as the school didn't have a bat-winged/cape pattern piece so with the help of the teacher we had to make it up.
Below you can find images that show the process that I went through to create this dress.
Thank you so much for reading,
Love Karmann Jean

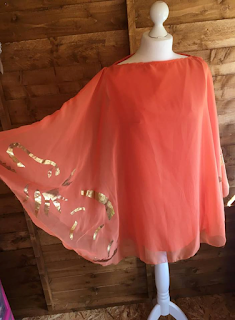
This is my Chinese inspired bat-winged dress.

My initial ideas on what I wanted to create and research.

Mood board.

Some initial shape and pattern ideas.

Some initial shape and pattern ideas.

Design 1.

Techniques tested for design 1, including, texi-foil, laser cutting, and embroidery.

Design 2.

Design 3.

Design 4.

Final design.

This is my pattern piece for my batwing dress, which we had to make up.

Testing out the pattern piece.

This is the under dress for my bat-winged dress as the actual batwing will be made from chiffon to allow it to move freely and as it is transparent I need and undress to cover the body.

Pinning the decorative zip in place.

Here I am sewing around the outside of the chiffon batwing dress to stop it from fraying.

Bat-winged chiffon dress attached to the under-dress.

Showing the batwing effect.

This is the head of the texi-foil dragon.

This is my friend modeling my final product.

Back of final product.

Final product with arms raised.

Back of final product with arms raised.

Front of the dress.

Back of the dress.

Texi-foil dragon.

Sleeve details.

Close up of zip fastening.
Really like reading your post. 👍🏻👍🏻
ReplyDeleteLoved the way you described every step.
Thank you so much Gul E Raana, you are so kind
Delete